|
Joytrol Manual
Table of continents
Introduction
Joytrol is a LightWave 3D plugin designed to give you easier control while animating.
It is a nodal based system that lets you control animation channels using 2D or 1D sliders.
Joytrol is aimed mostly at animating facial expressions using LightWave 3D's Endomorphs,
but it may also be used to animate the position, rotation, scale, etc... of objects in LightWave's Layout.
Joytrol is a custom object plugin meaning that it gets applied to an object in layout.
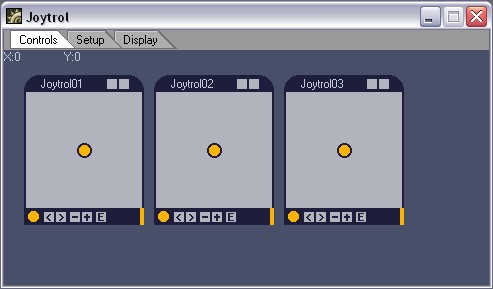
The interface consists of three main tabs: Controls, Setup, and Display.
To install Joytrol, simply choose "Add Plug-ins" in Layout and select the file called "Joytrol.lsc".
To load it, select "Joytrol" from the "custom object" drop down menu from under the object properties panel.
To launch Joytrol from the Layout menu, you may add the "Joytrol_Launch.lsc" file to Layout and add it to the menu.
Clicking on it from the menu will launch Joytrol.
Because Joytrol works morph channels and other channels as well, it uses groups. It is therefore important to have the morphs grouped by naming
them in the form "groupname.morphname" (for example: "Eyes.Blink") for Joytrol to recognize them.
Important note: The Joytrol settings currently don't get saved with your scene but can be easily saved to a file using Joytrol. This is for reasons of channels not being loaded before Joytrol trys to locate them.
Once a scene is loaded, if Joytrol is already present, first press "Refresh Channels" from the display tab before loading the settings and reopen the interface.
Each part of this manual may be viewed in video format as well, by clicking on the video link next to the topic title.
. . .
The Controls Tab
[video: avi (~2.52Mb)
mov (~0.62Mb)]
The controls tab is the main interface that we will be using. Here is where all the nodes are that we can use to animate our characters.
Each node can have three different forms. "Full Box" meaning a square with up to 8 different directions, "Half Box" with up to 5 different directions,
and slider with up to 2 different directions. When we say "directions" we actually mean a direction to which we can apply a morph or another channel
such as: top left, top center, top right, left middle, right middle, bottom left, bottom center, and finally bottom right.
Each node may be:
- moved around by clicking on the title and draging
- resized by clicking and dragging on the bottom right corner
- minimized by clicking on the top right square
- locked, meaning that it can not be moved nor resized, by clicking on the second top right square
The buttons on the bottom, from left to right are :
- Filled circle. Indicates there is a keyframe on the current frame. Empty circle means there is no keyframe.
- Left arrow goes to the previous keyframe.
- Right arrow goes to the next keyframe.
- The minus button (-) removes the keyframe from the current frame.
- The plus button (+) adds a keyframe from the current frame.
- The E button (envlope) opens up the graph editor with the channels applied to the node selected.
The whole interface may be resized as well.
. . .
The Setup Tab
[video: avi (~10.33Mb)
mov (~5.50Mb)]
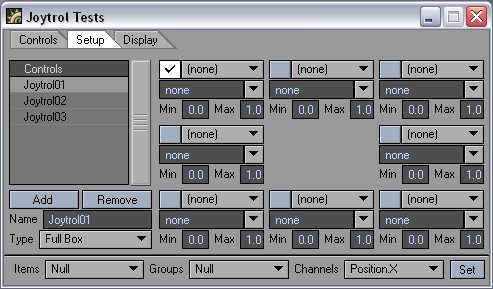
The setup tab is where we can rename nodes, choose the node type, and assign the channels to each node.
Select from the list box an item (multi selection is not supported).
- To rename it, type the new name in the "Name" input field and press enter.
- To change the node type from "Full Box" to "Half Box" to "Slider", choose the wanted form from the "Type" dropdown menu.
There are a maximum of 8 directions for which a channel may be assigned.
These directions are represnted on the right side of the interface by a group of controls for each direction.
The controls are the following:
- The little check box is only needed for applying channels from the "channel bar" at the bottom (explained later on).
Only one direction at a time may be selected this way, and it is to that direction that a channel,
picked from the channel bar at the bottom is applied to.
- The first dropdown menu has four options:
- "(none)" means that this direction does nothing.
- "Morph" means that when the control is dragged in the direction of this channel the morph (or any other channel) is applied accordingly.
- "Add" mixes the channels of both sides so that they both are at 100% when this direction is at 100%.
- "Add + Morph" does the same as "Add", but it may have a channel of it's own too.
- The text input just displays the assigned channel. Modifing its value won't modify the assigned channel.
- The little drop down arrow is a quick morph picker.
Once MorphMixer has been applied to the object, you can quickly select from this list a morph channel to be applied to that direction.
- The "Min" and "Max" fields are the maximum and minimum vales that this direction will apply to the assigned channel.
With percentage channels, such as morphs, 1.0 is 100% and 0.0 is 0%. ther is no limit to the possible values and negative values are also possible.
At the bottom of the interface there are 3 drop down menus and a "Set" button. This is the "channel bar".
From here we can assign channels but we are not limited to morphs alone.
- The first drop down menu is the "mesh" drop down meaning you may pick from it the mesh or object with the channels you want to assign.
- The second drop down is the "group" drop down. The group with the same name as the mesh contains the position, rotation and scale values.
Other types of groups include bones, and morph groups
- The third drop down is the "channel" drop down meaning it's from here that you may pick the channel to be assigned.
- The "Set" button assigns the selected channel to the direction with the little check box checked.
. . .
The Display Tab
[video: avi (~7.13Mb)
mov (~2.96Mb)]
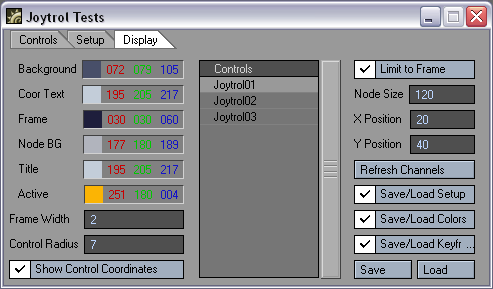
The third and final tab is where you can change the look of the Controls tab area or, as some may call it, the "main interface".
The tab is split into 3 major parts. On the left we have a list of color controls from where we can change the color of the "main interface".
In the center we have a list box with all the nodes. The 4 top controls on the right are part of the same group as the list box,
meaning that the changes made will affect the items selected in the list box (multiple selection is supported).
The last part, on the bottom right, contains all the saving/loading options.
Refresh Channels: Joytrol creates an internal list of channels so as to not have to find all the channels all the time.
More chanels may be added to your scene after running Joytrol (for instance, by adding MorphMixer).
For Joytrol to know about these new channels, press the "Refresh Channels" button.
(Note: The interface needs to be reopened for the changes to take affect on the morph drop down menus)
We don't always want to save all the Joytrol information nor do we always want to load all the information saved to a file.
For instance, we may have a settings file from which we want to load the colors but not the setup or vice versa.
This is all very possible by simply checking the options you want to load or save before pressing the "Save" or "Load" button.
The third option, "Save\Load Keyframes" saves or loads the frames at which each node has a keyframe set.
It does not save/load the position of the control, but rather just the time.
This is useful for when you load scene and want to load the position of the keyframes along with the setup.
. . .
Joytrol Quick Start Guide
[video: avi (~21.00Mb)
mov (~6.40Mb)]
This guide is meant to quickly show you the use of Joytrol and at the same time teach you how to use it by recreating a given example.
First we need to load the plugin. Add the "Joytrol.lsc" and the "Joytrol_Launch.lsc" files to Layout using the "Add Plug-ins" command under the utilities tab. You may add Joytrol to your Layout menu by choosing "Edit Menu Layout" from the "Edit" menu and adding the plugin named "Joytrol" to the menu.
Load the supplied "JTFace.lwo" object and apply "Morph Mixer" to it. For the morphs to be displayed correctly, set the "Subdivision Order" to "Last" from under the object properties panel. From the "Custom Object" plugin dropdown, choose "Joytrol". Open the plugin properties by double clicking on it.
As you can see, Joytro is made of three main tabs: Controls, Setup and Display. We'll load an existing example. Go to the Display tab and click on "Load" from the bottom right. Select the supplied "JTQuickGuide.txt" file. Go to the first tab, "Controls", and see that the setup has been loaded.
Let's examin this before moving on. The interface is made of different nodes that can have 3 shapes: Full Box, Half Box, and Slider. Each node can be moved around by clicking on the title and draging. Each node has a control in the center that can be moved around. You can click and drag on it and see the model deforem accordingly. Middle clicking (or CTRL clicking) will move the control horizontally while right clicking (or Shift + Clicking) will move it vertically. Double clicking will reset the position to the center (0,0).
Go to frame 10. Notice the little circle on the bottom left of the node? Now move the control around. It just became colored. This means that a keyframe was created. Now click on the little "-" (minus) button, the keyframe is gone. Click on the "+" (plus), a keyframe has been made.
The "<" (left arrow) button goes to the previous keyframe, and ">" (right arrow) goes to the next keyframe. The "E" button opens up the graph editor with the node's channels selected.
Click and drag on the rectangular control on the bottom right to resize the node. Click on the little box in top right corner to minimize the node (only the title is visible), and the box to it's left will lock the node meaning that only the control can be moved but the node cannot be resized nor moved around.
That is all for this tab, now lets recreate this setup ourselves. Remove Joytrol and apply it again so as to reset everything. Go to the second tab, Setup, and select from the list on the left the first item "Joytrol01". Rename it by typeing "Blink" into the "Name" input and pressing enter.
On the right we have 8 channels for 8 directions. Next to the text input that says "(none)" there is a little down arrow. Click on the one belonging to the top left channel. As you can see this gives you a list of all the morphs applied to the object. Select "Eyes.Shocked_R" (our left is the models right). Select "Eyes. Shocked_L" from the top right one, "Eyes.Blink_R" from the bottom left, and "Eyes.Blink_L" from the bottom right.
We now have a morph at every one of the four corners. Each channel has a main dorp down menu that is currently set to "(none)". This decides how that channel will behave. "(none)" means it does nothing.
Set all four corners to "Morph" and go to the first tab, "Controls", and move the control around. Each corner applys the morph correctly, but we can't get both eyes to blink at the same time. Go back to the second tab, Setup, and set all four corners back to "(none)". Set the top and bottom directions to "Add". This means it mixes both morphs on its sides (to put it in a simple way). Now if you play with the control you can have both eyes blink at the same time.
Select the second item from the list, "Joytrol02". Rename it to "Left Brow". Choose "Brows.Up_L" for the top center channel, "Brows.Down_L" for the bottom center channel, "Brows.Sad_L" for the left middle channel, and "Brows.Mad_L" for the right middle channel. Select for all four corners "Add". Go to the first tab, "Controls", and see how it all works. Suppopse we think dragging the control towards the bottom brings the brow too far down. Go back to the second tab and type 0.5 for the "Max" input for the bottom center channel. This means that when the control is at its maximum in the "down" direction, the morph will be applied at 50% of the full morph instead of 100% (which would be the case if the "Max" input was set to 1.0).
By now you should be able to set up the third control "Right Brow" by yourself without any problems. Once this is done, click on "Add" from under the list box to add a new node. Select the new node and call it "Fear!". From the "Type" dropdown, choose "Slider". This means that this node will be a slider instead of a full box. Notice that we now only have 2 channels. Select the "Ex.Scared" morph for the left channel and set it to "Morph". Select the "Ex.Scream" morph for the right channel and set it to "Morph" too.
Go to the first tab and reposition the controls in a more oderly way. Now you should be able to add a second slider node called "Happy" with the "Ex.Smile" morph for the left channel and "Ex.Cheese" for the right channel.
Go to the third tab "Display" and save it to a file since the Joytrol settings currently don't get saved with the scene.
That is it for this simple set up just to learn the basics of Joytrol. Now be creative and take it to the next level!
. . .
|
|
|