|
|
| |
|
QuickPickerPro v3.0 Manual
Table of continents
|
You may jump to a section of this manuel by clicking on one of the links below or by scrolling down.
|
|
Installation
To install QuickPickerPro 3.0 when an old version is already installed, copy the provided files to the directory where you have QuickPickerPro
and replace any earlier file unless you have made some changes to one or more of them, and leave those as they are. In Layout, click on 'Edit Plugins'
from the "Utilities tab" (or 'Layout>Plug-ins>Edit Plug-ins' in a version earlier than 8), choose to have the list sorted by 'File', select the plugin
called 'QuickPickerPro_2.4b' and press delete.
If you do not have an earlier version of QuickPickerPro installed, copy the provided files to the directory where you would like them to be. In Layout,
click on 'Add Plugins' from the "Utilities tab" (or 'Layout>Plug-ins>Add Plug-ins' in a version earlier than 8), Select the files that have a '.lsc' or '.ls'
extension. Add the 'QuickPickerPro' plugin to the layout menu to have easy acsess to it. You can do this from the 'Edit>Interface Menu Layout' panel
(or 'Layout>Interface>Layout Menu Interface' in a version earlier than 8).
To run the plugin, simply hit the 'QuickPickerPro' button you just added to the menu.
You can close it if you wish and it will not loose the settings when you reopen it using the same button from the menu.
The default setup for the items to be selected matches the T4D rigging tools. Since this plugin is configurable, you can replace the 'Default.QPP'
file with your own saved settings and make it the default. You may also use the 'Make Default' function.
When you first run QuickPickerPro, if the character you are rigging was not rigged using the T4D rigging tools,
you'll be asked to select the main character mesh meaning the mesh that includes the bones.
|
|
The Main Interface
This is the interface which you will be using the most. When using the plugin this interface will almost always be open and
it's from this interface that you will click on buttons to select the wanted items.
Read the next part, Mouse functions and shortcuts, to learn how to use it.
|
|
Mouse functions and shortcuts
There mouse functions are:
- Left mouse button - select the item(s) assigned to the button.
- Middle mouse button - alows you to click on multiple buttons and in doing so select multiple scene items.
- Shift + Click - does the same as middle clicking.
- Right mouse button - will pop up a message telling you what the part of the rig the button corresponds to.
- CTRL + Click - assigns the selected items to the button that was clicked on. It's advised to check out the
Assign Mode and using the
Items Selection panel.
- CTRL + Shift + Click - Assign what tool to be selected when clicking on the button. Read also about the
batch tool selection.
- CTRL + ALT + Click - Assign a command to a button. Read more about it and the options in the
Assign Commands section.
There keyboard shortcuts are:
- t / y - Move (t) and rotate (y) tools. When a window is in focus (such as a picker) the LightWave keyboard shortcuts don't work.
These two were added since they are used a lot for animating and posing.
- c - Configuration options. Instead of having to create a button for the configuration options, you can just use this shortcut. For
more about the the configuration options, read the configuration options section.
|
|
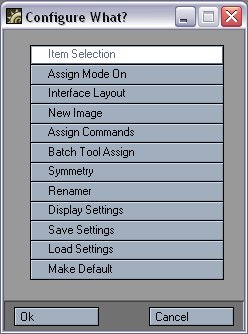
The configuration options
This panel gives you access to all the configurable options of this plugin including the save and load options.
To open it, just hit the 'c' shortcut or click on the 'Configure' button on the main interface.
When configuring, an 'OK' and 'Cancel' button might appear caused by moving a panel over the main panel
(a small bug that will hopefully be fixed soon). Simply closing and reopening the interface will solve the problem.
You have the following options (click to read more about them):
|
|
Adding a New Background Image
Make a simple render of your character or take a screen shot of it. If you want to you can use your favorite image editor to modify the image
how ever you wish. This image must be saved as a '*.tga' image. It image can have any frame size/colors...
When you choose to select a new image a file requester will come up asking for the file. If the file you choose doesn't exist you will be told so.
After hitting 'OK', the panel for defining the buttons (or click areas) will come up.
Go to the next part to read about defining buttons (click areas).
|
|
Defining buttons (click areas)
The controls are the following:
- The image source, width and height are displayed but are not changeable. For that you have to change the image.
- The list with all the possible buttons is where you choose what button you would like to define it's top-left and bottom-right coordinates.
- Next to the list there are a '+', '-', '^' and 'V' buttons. These stand for add, remove selected, move up selected,
move down selected. The 'Configure' button can't be changed in anyway using these buttons.
- The 'TL' and 'BR' in the vertical choice menu stand for 'Top Left' and 'Bottom Right'. Those are the two points
(4 coordinates) that define each click area. Whichever is pressed ('TL' or 'BR') is the point which will currently be edited with
the mouse when you click on the image.
- The 4 integer inputs are the values of the 4 coordinates that define each click area. These values can be changed numerically or using the mouse.
- The 'Hide Click Area Box' and 'Show Click Area Box' hide or how the defined area for the currently selected button from the list.
- 'Reset Button Names' will reset the names of all the buttons.
- 'Reset Button Positions' will reset the X and Y positions of all the buttons to be 0.
- If 'Show All Boxes' is checked, all the boxes will be shown.
- 'Reset Current Button' will reset the X and Y positions of all the currently selected button.
- 'Scale All' will scale all the click areas by the given number (1.0 is 100%, 0.5 is 50%...).
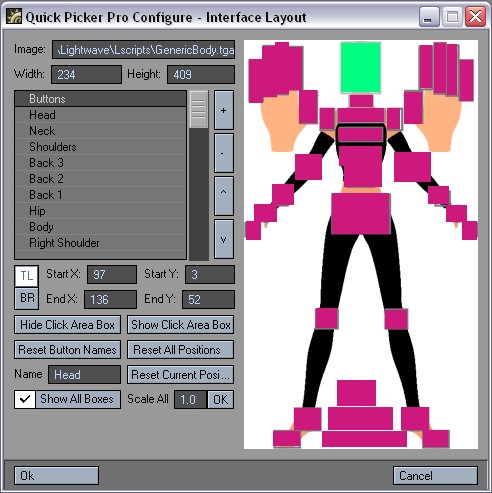
Every time you select a button from the list it's defined area is shown as a green box. You can hide it if it bothers using the 'Hide Click Area Box'.
While the 'TL' button is pressed, click anywhere on the screen and drag till your mouse is over the top left point of the
click area you want to define. The dragging line can help you find a corner of a non rectangular shape (i.e: a circle). When you let go,
a blue dot will appear showing the point and the 'BR' option will automatically get pressed (or 'TL' if 'BR' was already pressed)
and the coordinates will be changed. Then when you click again on the image, drag untill the mouse is over the bottom right point and when you let go a
green box will appear indicating the whole click area. The 'TL' option will then get selected and the coordinates will be changed according to where you released the mouse.
Once the area is defined (it doesn't have to be exact) select the next button you
would like to define from the list.
This whole process takes very little time once you try it out.
|
|
Assign Mode
There are a couple ways to assign items to a button. One is the 'Assign Mode' as mentioned here, and the
other way is explaind in the next part.
To turn assign mode on or off, click on the 'Assign mode on' button under the configuration options panel,
or you can just CTRL + click. The message 'Assign Mode' will be written at the top left of the screen so you know you are in it.
You can also change the color of that text from the Display Settings panel.
If you are in the assign mode, you can select whatever items you want to assign to a button and then click on the button and those items
will be assigned to it.
A popup message will tell you the names of the items that were assigned. you can turn this off from the
Display Options panel.
|
|
Assigning items to buttons
As mentioned before, the default items that will be selected go with the T4D rigging tools but can be changed
(see the Installation section). If you are using a different rig,
it is advised that you first click on 'Reset All' so that you won't get any errors about items not existing.
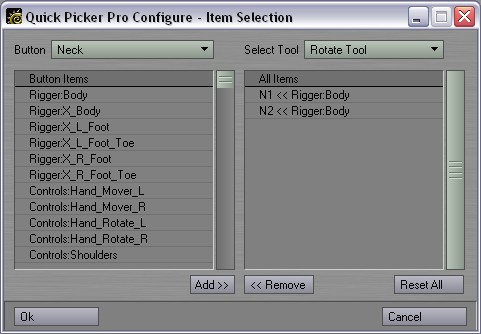
Make sure you also read about the Assign Mode which is a simpler way of assigning items to buttons.
The list on the right is a list of all the items and bones and the list on the right is the list of items that will be selected
by the button that is currently being edited.
From the 'Button' menu, select the button for which you'd like to change the items it selects.
Select what you want or don't want and add or remove it using the 'Add' and 'Remove' buttons. You can assign a tool to be selected
when the button is clicked or you can assign it later to many buttons at once using the
Batch tool selection.
|
|
Batch Tool Selection
This interface allows you to assign the tool that will be selected when clicking on a button to multiple buttons at a time.
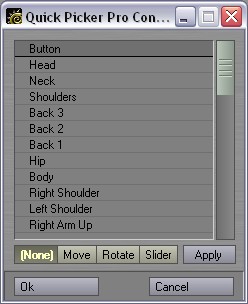
Select the buttons you'd like to have select the same tool, select the tool from the choice menu at the bottom and hit 'Apply'.
If nothing happens that is normal.
|
|
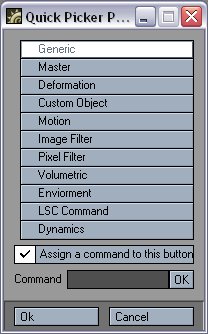
Assign commands
From this panel you can assign commands to buttons instead of selecting items. If you decide to disable the command for a certain button,
that button will select what it was told to before.

Select the button you'd like to apply a command to, check 'Assign a command to this button' (uncheck to unassign), choose the plugin type or command,
type the command in the 'Command' input and click 'OK'
This can also be applied to buttons individually by CTRL + ALT clicking on the button. (see the
Mouse functions and shortcuts section.)
The 'Generic', 'Master', 'Deformation', 'Custom Object', 'Motion', 'Image Filter', 'Pixel Filter', 'Volumetric' and 'Enviroment' types are plugins.
The command you'd have to type is usually the name of the plugin (without spaces between words), or the name of the plugin with "LW_" infront of it.
Common examples are:
- Generic - FPrime - FPrime from Worley Labs.
- Generic - ExpresssoFit - Fits the Expresso face controls.
- Master - SceneEditor - The new LightWave [8] scene editor with a dope sheet and all.
- Master - LW_LscriptCommander - LScript Commander.
- Deformatin - LW_MorphMixer - Morph Mixer.
- Deformatin - SasLite - SasLite Settings.
- Image Filter - LW_VectorBlur - Vector Blur settings.
- Volumetric - HyperVoxelsFilter - The HyperVoxels settings.
- Environment - LW_ImageWorld - The Image World settings.
- Environment - SkyTracer2 - SkyTracer 2.
For the 'LSC Command' type, you can open up LSCommander, do something in LightWave and see the command LScript Commander gives. Common examples are:
There are seven commands for the 'Dynamics' type. This kind of command only works on LightWave 8.0 and higher (the case isn't important):
- Cloth
- Soft
- Hard
- Emitter
- Wind
- Collision
- Gravity
|
|
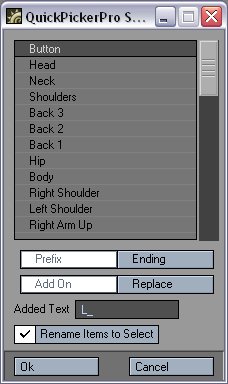
Symmetry
Once you have set up QuickPickerPro on one side of the image, you can use the symmetry function to mirror the desired buttons.
Select the buttons you would like to mirror from the list, choose the renaming options you would like and press OK. This will mirror the click areas
renaming each button and the items it selects according to what was chosen. It also keeps the tool to select and the commands that were assigned (if any).
|
|
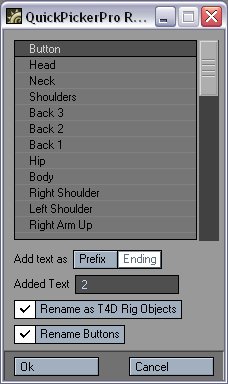
The Renamer
The Renamer allows you to rename the names of the items to be selected for the desired buttons.
Say you used the QPP_Renamer to rename all the controls of a character (needed to have multiple characters in a scene with QuickPickerPro),
you can then just use this renamer tool to make QuickPickerPro work with it.
|
|
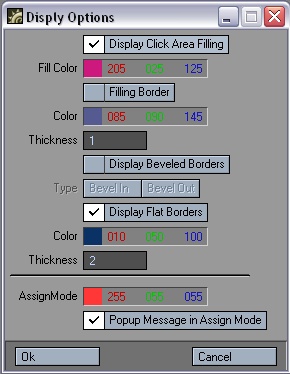
Display Settings
You can have QuickPickerPro show the boundaries of all the buttons instead of adding them with an image editor.
If you are going to have filled squares and a border you should use the 'Filling Border' (faster). If not you have other border options.
'Assign Mode Color' is the color the text on the top left will be when you are in assign mode.
You can also disable a popup message from coming up everytime you assign items to a button by unchecking 'Popup Message in Assign Mode'.
|
|
Saving settings
To save the settings (of everything: image, click areas, selected items, selected tools) choose the 'Save Settings' option from the
'Configure Options' panel. A file requester will pop up asking what you would like to save it as. If you want this setting to be loaded
by default every time you start up QuickPickerPro, replace the 'Default.QPP' file with the new settings file.
The settings file get saved as a '*.QPP' file.
You can easily edit any QuickPickerPro settings file with a simple text editor.
The settings get saved with your scene when you save your scene.
|
|
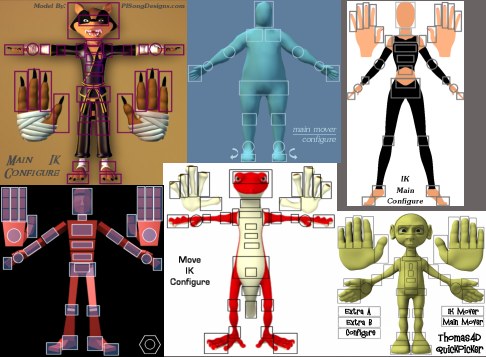
Load settings
You can load settings from an earlier character or from one of the supplied settings file by choosing the 'Load Settings' option from the
'Configure Options' panel. Once doing so you need to simply close and reopen the interface for the changes to take effect.
This image shows only some of the picker images that come with QuickPickerPro:
|
|
Make Default
You can replace the 'Default.QPP' file in the QuickPickerPro directory with a different settings file to make it the default. Meaning that when you first open up QuickPickerPro,
Those settings will be used.
An easier way to do it is to simply choose the 'Make Default' function and click OK. The current settings will be saved as the default settings.

|
|
Use of Multiple Buttons
There are many uses for creating one button on top of another. First of all, it's the first button in the list that
gets picked first and the last that gets picked last.
Such uses are:
- Sometimes parts of the body are inside another (i.e., the eyes are in the head). For this just create the outer button bigger.
In such a case, you can click on the smaller button to select just its items, or, shift click/middle click to select the items of both buttons.
- When applying displacement, motion or custom object plugin commands, it is important to have the right object selected. Create one button that
selects and a second on top of it to which you assign the command.
|
|
More info
|
|
|
|